
How to Upgrade Cisco ASA Firewalls
This blog post outlines a simple and effective method for upgrading and verifying Cisco Adaptive Security Appliance (ASA) Active/Standby firewall clusters or standalone firewalls. It follows our network change implementation success principles to ensure the upgrade goes smoothly and minimizes impact.
With the ever-increasing number of vulnerabilities and attacks happening against critical firewall infrastructure, the need to patch your firewalls quickly is critical. Having a well-developed and efficient firewall upgrade plan can allow your organization to respond quickly and mitigate the risk. Many common Cisco ASA implementations can follow this guide with the upgrade only lasting ~20 minutes for each highly available (HA) failover implementation, plus additional time for any verification and testing.
The Scenario
This guide uses an example scenario of upgrading Cisco ASA failover firewalls as a result of a recently released VPN Denial of Service (DoS) vulnerability. We previously discussed this and several other Cisco ASA vulnerabilities and the risk they pose to organizations running affected software. In this example, we will be doing a minor version upgrade from the affected version 9.12(4)4 to the unaffected version 9.12(4)18. This guide is useful for firewalls in single context mode but can be adapted for firewalls in multiple context mode.
Additional adaptations to the below steps may be required to suit your implementation, such as adding or removing pre-change and post-change verification for any protocols you have configured, or business-specific verification steps.
Planning the Upgrade
Before preparing to upgrade your Cisco ASA firewalls you need to perform a little research. Areas that you may wish to review include:
- The security advisory for any workarounds that may work for your organization and thus could enable you to avoid having to perform a software upgrade.
- The release notes for Cisco ASA software version 9.12(4) to identify any changes in features and the appropriate target upgrade path. Also review this software compatibility matrix if you are using any additional tools (e.g., ASDM) or modules (e.g., FirePower Module).
- Review any design documentation that you have for your implementation. This can help guide any verification procedures that should be performed.
- Identify business-critical applications that rely on these firewalls, so that those applications can be verified post-upgrade.
Cisco ASA failover allows for the synchronization of some stateful information such as NAT translations, TCP/UDP connections, ARP entries, ISAKMP and IPSec SAs, remote access VPNs, and other features. This helps reduce or eliminate most impact to your users and services, as the Standby firewall can immediately continue providing connectivity.
To ensure your upgrade goes smoothly, you should review your failover configuration to confirm that it follows the standards Cisco describes. If configured correctly, most upgrades can be performed with minimal to no interruption experienced by end users. However, you should create an extensive list of data gathering commands so that you can validate the health of your firewall and all its features in the event the upgrade does not go as planned.
Review your configuration to identify each of the protocols in use and identify appropriate commands that would validate the health of these protocols. If your firewalls are in multiple context mode, you will need to identify data gathering commands for each context. As you will see in the implementation steps below, gathering this output may produce a lot of text. An added benefit is that this output makes it easier to identify whether a change implemented during a maintenance window is the cause of any issues experienced when the business opens the next business day. If you have captured the state of your firewalls post-upgrade, you have evidence of what state your firewalls were in after the upgrade was completed.
You can also pre-stage the new software package on both your Active and Standby firewalls. Depending on their physical location and where you will be uploading the software package from, this could take time that you may not have during a maintenance window.
Implementing the Upgrade
Now that you have properly prepared for your upgrade and have pre-staged the new software packages on both your Active and Standby firewall, it is time to bring your firewalls to a new software version.
All commands below are to be performed on the Active firewall in the failover pair. Note that partway through these steps the Active firewall will change from your Primary firewall (assuming the Primary firewall was Active at the start) to your Secondary firewall.
- Begin by logging into the Active firewall via SSH.
- Perform pre-change information gathering by capturing output from your device. Save this output to a text file by using a feature like PuTTY’s logging functionality. Commands will need to be adjusted based on the features and protocols you use on your firewall, but below are a few examples. To avoid pagination of the output (which can make performing a diff on your text files difficult), we start by setting the pagination length to 0 (no pagination).
terminal length 0
show clock
show version
show bootvar
show running-configuration
show interface
show interface ip brief
show nameif
show flash: all
show memory
show inventory
show cpu usage
show failover
show failover history
show ospf neighbor
show eigrp neighbor
show bgp summary
show route
show vpn-sessiondb summary
show vpn-sessiondb l2l
show conn count
- If you have a Cisco FirePOWER Module installed in your Cisco ASAs, perform a device backup and capture the current device status of the installed modules and any protocols or features that are configured.
- Capture the state of any business applications that are critical. It is better to understand what the state of a business application is before the firewall upgrade. This ensures that it will not be incorrectly assumed that the firewall upgrade is contributing to issues with the application after the upgrade is complete if the application was already not working before the upgrade.
- Confirm that you are logged into the current Active firewall by identifying the output “This host: Primary – Active” (Note: If your firewall has experienced a failover event recently, the output may show “Secondary – Active” – the important piece is that you are in whichever firewall is Active).
HQ-Firewall/act/pri# show failover
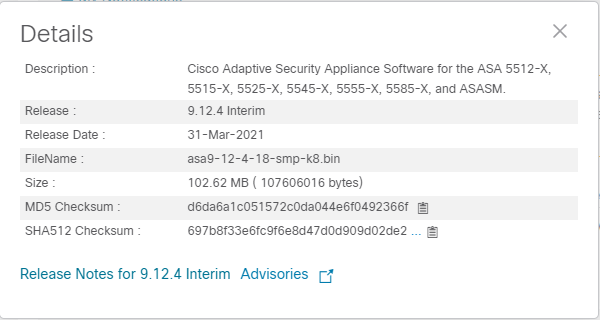
- Verify that the new software package (in our example asa9-12-4-18-smp-k8.bin) is located on the flash of your Active and Standby firewalls.
HQ-Firewall/act/pri# show flash:
HQ-Firewall/act/pri# failover exec standby show flash
- Perform an MD5 checksum of the software package on both the Active and Standby firewalls to validate that the software package file has not been corrupted when downloading the file from Cisco’s site or uploading it to the firewalls. This will generate a hash value that you should compare with the hash value listed on Cisco’s software site when the software package was downloaded.
HQ-Firewall/act/pri# verify /md5 flash:asa9-12-4-18-smp-k8.bin
…!!Done!
verify /MD5 (disk0:/asa9-12-4-18-smp-k8.bin) = d6da6a1c051572c0da044e6f0492366f
HQ-Firewall/act/pri# failover exec standby verify /md5 flash:asa9-12-4-18-smp-k8.bin
…!!Done!
verify /MD5 (disk0:/asa9-12-4-18-smp-k8.bin) = d6da6a1c051572c0da044e6f0492366f
- Adjust the boot variables. The order of how the boot variables are configured influences the order of software packages the Cisco ASA will attempt to load when booting. As a result, we must briefly remove all boot statements currently configured and then reapply the new boot statements. We will keep the previous software version listed as a backup. In this example, 9.12(3)12 was the previous backup and we are currently running 9.12(4)4.
HQ-Firewall/act/pri(config)# no boot system disk0:/asa9-12-4-4-smp-k8.bin
HQ-Firewall/act/pri(config)# no boot system disk0:/asa9-12-3-12-smp-k8.bin
HQ-Firewall/act/pri(config)# boot system disk0:/asa9-12-4-18-smp-k8.bin
HQ-Firewall/act/pri(config)# boot system disk0:/asa9-12-4-4-smp-k8.bin
- Save the configuration so that the boot variables will now be set.
copy running-config startup-config
- Confirm that the boot variables on next reload will now indicate 9.12(4)18 first, followed by 9.12(4)4.
HQ-Firewall/act/pri# show bootvar
- We will upgrade the Standby firewall first. This ensures that we do not interrupt traffic flowing through the Active firewall if the upgrade fails on the Standby firewall. No users or services will experience impact. We can work to restore the Standby firewall, and if you are able to restore the Standby firewall to the new version, you can discuss with stakeholders if you should proceed further with upgrading the Active firewall. Initiate the upgrade on the Standby firewall with the following command:
HQ-Firewall/act/pri# failover reload-standby
- Monitor the status of the Standby firewall with the command below, or using a terminal server connected to the Standby firewall. The command below will list the Standby firewall in a ‘failed’ state, but as the firewall reloads, it will transition through several states while it synchronizes configuration and state information. You will know when the Standby firewall has recovered when its state is ‘Standby Ready’, and any monitored interfaces have a state of ‘Normal (Monitored)’.
HQ-Firewall/act/pri# show failover
- Once your firewall has completely recovered and is in the ‘Standby Ready’ state, confirm that it is now running the new software version 9.12(4)18.
HQ-Firewall/act/pri# failover exec standby show version
- Now that the Standby firewall is running the latest version of software, we will gracefully promote that firewall to be the Active firewall. When issuing this command, the firewall will immediately drop your SSH session. However, within one or two seconds, you should be able to SSH back to your newly promoted Active firewall (the Standby firewall we previously upgraded).
HQ-Firewall/act/pri# no failover active
- SSH back into your firewall and confirm that the former Active firewall is now the Standby firewall by issuing the following command and looking for the output “Other host: Secondary – Standby Ready”:
HQ-Firewall/act/sec# show failover
- At this point in time, you may wish to perform an extensive verification to ensure the newly promoted Active firewall’s features and protocols are successfully passing traffic. The benefit of doing this now is that you have an opportunity to promote your previous Active and functioning firewall (still running 9.12(4)4) back into Active status should issues be experienced. Verification could include:
- Running the same pre-change information gathering commands documented in step 2 and comparing against the previous output to ensure that the state of critical features and protocols is operational. This can be accomplished by using a text diff tool which provides contextual highlighting for easily identifying changes between the two files.
- Capturing the current device status of the installed module and any protocols or features that are configured (if you have a Cisco FirePOWER Module installed in your Cisco ASA).
- Having users test critical business applications.
- If all verifications are successful, proceed to reload the new Standby firewall. This will allow it to move from running the 9.12(4)4 image to the 9.12(4)18.
HQ-Firewall/act/sec# failover reload-standby
- Monitor the status of this firewall as described previously to ensure that it rejoins as a ‘Standby Ready’ failover firewall and that all monitored interfaces are normal.
- Once your firewall has completely recovered and is in the ‘Standby Ready’ state, confirm that it is now running the new software version 9.12(4)18.
HQ-Firewall/act/sec# failover exec standby show version
- We will now promote the Standby firewall to being the Active firewall, which will leave the firewall failover states as they were before beginning the change. Assuming that the Primary firewall was Active at the beginning of the change, this will ensure the Primary firewall is Active as we finish. As previously mentioned, this command will disconnect your SSH session, but you will be able to reconnect almost immediately.
HQ-Firewall/act/sec# no failover active
- At this point in time, both firewalls should now be running 9.12(4)18. Proceed with performing post-change verification by:
- Running the same pre-change information gathering commands documented in step 2 and comparing against the previous output to ensure that the state of critical features and protocols is operational. This can be accomplished by using a text diff tool which provides contextual highlighting for easily identifying changes between the two files.
- Capturing the current device status of the installed module and any protocols or features that are configured (if you have a Cisco FirePOWER Module installed in your Cisco ASAs).
- Reviewing any monitoring system to identify if any alarms are still critical for the devices you have just upgraded.
- Having users test critical business applications.
Post-Upgrade Steps
Now that your firewalls have been upgraded, you may wish to perform several additional tasks, such as:
- Removing any software packages that are no longer in use. In our example, we previously had a software package for 9.12(3)12 configured as a backup package in our boot variable. As we now use 9.12(4)4 as our backup package, 9.12(3)12 can safely be removed from the flash. This will need to be performed on both your Active and Standby firewalls. You will be prompted to acknowledge deleting the file.
HQ-Firewall/act/pri# delete disk0:asa9-12-3-12-smp-k8.bin
- Copying a new ASDM software package to your Active and Standby firewall and configuring the firewall to use the new package (if you use ASDM within your organization to manage your firewall and the software compatibility matrix identifies the need to update ASDM).
HQ-Firewall/act/pri(config)# asdm image disk0:/NEWIMAGENAME.bin
- Updating any reference documentation or change tickets.